Church of Kumachi

We’re in the final arc of One Piece after two decades, and as someone who started reading this as a teenager, it’s been a long journey. Not only for One Piece, but for my art as well, from trying to find my footing of wanting to do illustrations and comics, to finally making 3D as well. I wish I could’ve told my teenage self that I’d be just as unsure where I want to go as an artist then as I am now 20 years later. “Church of Kumachi” is a bit of a spoiler, although I’m not sure how much of a spoiler it is as it stands on its own. I think as soon as I saw it I really felt I wanted to model it, it has such an interesting design and it stands on its own so well. I’m really happy I’m in a space nowadays where I before saw some cool things and thought “wow I wish I could model that” to now when I feel like I can.

As soon as I saw this in the manga, I was drawn in by it. I really just wanted to see this in 3D.

I finally started the “right way” of sketching up all the materials that I wanted before even getting into slapping the whole creation together.

Unlike my last piece, I decided to not build this as much in modular pieces since I knew all the final pieces anyway. I felt it gave me more flexibility to be able to play with silhouettes and shapes more. Speaking of silhouettes and shapes: that really was the main challenge for this. I feel like my own style focuses a lot on nitty gritty details and knick-knacks, while Oda’s style has a lot of detail while also heavily relying on bulky, big silhouettes that you kind of need to get. As I was getting to the end of this piece, I did realize that I should’ve really tried to stick to the silhouette a lot more closely, but either way I’m pretty happy.

Another thing I did was to make a trimsheet where I tried to jam in as many materials as possible that I didn’t want to be tiling, so that would mean a beam for wood, metal, gold, etc. I thought I was being smart about this but honestly I think I’d maybe go back to each material just getting its own trimsheet in order to adhere to different widths without stretching and stuff, I think it just works better. As usual with 2D to 3D, I also had to make some changes.

What We Loved But Forgot

Sacrificed a lot of sleep for this project. I’m trying to be better with not letting some work consume sleep, but I feel that the tidal waves of creativity come so rarely that it’s difficult to just let them go to waste. 

If you rather listen to the process than read about it here, I also made a Youtube playlist with the process of this work.

It all started off with this old image I made back in 2008. It’s far from perfect, the colors are a bit damp and vague, the details are a bit scribbly, anatomy is off and the list goes on. And still there’s something I like about the image, it has this adventure and story-telling element to it, and I feel that I’ve lost track of that kind of thing in my latest art-pieces. So I wanted to revisit this idea and recreate this feeling.

I feel like there’s always this weird disparity between the art I want to create, and the art I can create. As I’m learning more and more tools and also refining everything, I feel like I’m slowly getting closer to being able to do the things that are in my vision. So at this point I feel like I really need to ask myself, what kind of art do I want to create and where am I heading?

I look at some stuff that I want aspire to in terms of feeling and art style, and apart from the more regular stuff, I’m also looking at art that I loved as a kid (and still love), and I look at this Swedish children’s book author and illustrator Sven Nordqvist.

I think I love the micro-storytelling in his illustrations, where almost every read-through you could just deep-dive into the pictures and almost interpret a little adventure or story on your own, and I think that this level of amount of details is something I want to aspire to.

This piece was a bit of a journey, in the upper-image you could see a stage I had reached where I almost close to abandoning the project. I felt like the different parts, the tree, the house textures, and the van were in terms of art-direction so extremely misaligned and I didn’t know how to fix it. I was also in a stage where I didn’t want to start a new project, because that would be to “admit defeat” on this project. Eventually a friend of mine looked at the project and wasn’t convinced the project had to be a failure. So that made me put on my big-boy pants and re-do some of the different parts like textures and some models.

The van in particular was pretty fun to model. Not at first, because I’ve never really modeled a van before, so in a way it was fun to finally tackle this challenge. I’m still trying to find my way in where I think it’s fine to use normal maps and where I want to model in details, but I’m more and more leaning into modeling details now and then just because I feel like having the modeled feature makes some of the lighting bounce around and work a little better. 

I also got try the thing all the cool people do where you combine one tiling texture along with a trim-sheeted modular set, and then using vertex coloring to get some variation of plaster coming through. I really enjoyed this process and I feel like it really helped me create this organic feeling that I enjoy.

I think I really love dealing with vegetation, and being so heavy in this scene, I think this is one of the parts that really did better in 3D than in the concept, where I could include a lot bigger biodiversity in my scene.

Another thing I really liked to do was learning SpeedTree’s vine-growth, which really intensifies the sensation that this objects and nature has become interwoven.

My last part I added was the chickens, I think it’s always nice to have some fun little playful thing to make the piece a little interesting. It kind of ties back a little into the Pettson and Findus idea of having some characters in the scene to give the feeling that someone or something live here. Unfortunately, unlike sketching where it’s pretty easy to just add characters doing different things, it’s not as clear-cut in 3D so I just ended up duplicating sleeping chickens over the scene. Maybe in the future I’ll come up with easier ways to incorporate characters doing small fun things in an easy way.

I think piece became one of those “taking a next step” kind of pieces. I learned a lot of in-engine things like vertex coloring, and I learned tons in Substance Designer and Painter. I feel that now that I’m incorporating the same technique and ideas, my style is becoming much more cohesive and objects don’t clash as much as they have done in my previous pieces.

Beach Vibes

For a long time I feel like I’ve been going a little crazy with tri-counts and materials, and that was fine for whenever I was just practising, but when I got the question from someone if they could purchase or use my model I just thought to myself “This is way too chaotic, you won’t really be able to use this in a clean working environment”. And then I started thinking about if I’d actually put up asset kits for sale, that would be a great push for me to create something that’s a bit more proper and clean. So I decided to go with this beach scene, and I have to say I really want the cooler box now.

Probably no secret that I love stylized, but I think something that I think differs Western stylization from Eastern stylization is that Western stylization has a tendency to simplify and enlargen shapes. What I can kind of enjoy in anime style is that it can still maintain a high level of detail. At the same time, what I enjoy with Western stylization is its dedication to silhouettes and shape language, so I like doing something in-between.

Like these glasses for example have a high level of detail, but they still have a strong silhouette from a distance so they’ll work for both up-close shots, but also from a distance if needed. They’re also highly adaptable to use in a more realistic scene as well if you want to swap its texture.

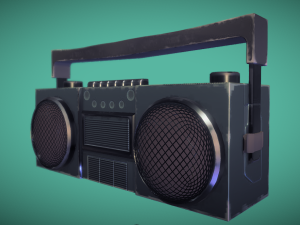
Same with this boombox, where it’s a bit realistic, but also has some stylization in terms of being a little bent here and there. I think in my mind, stylization doesn’t necessarily need to mean low-poly, but it’s about being able to maintain the essence of stylization.


I haven’t delved into this too much before because I always thought I could sculpt in details (like in the cap), which of course will always in reality generate the best result. But now that I was trying to create some assets that other people would use, I realized I’d have to make some optimizations. I feel like I’ve previously not been that succesful to create a good mix of normal maps and sculpted details, but in this piece I feel like they go quite well together.

Biggest take-away was probably getting more into Substance Painter and painting height data that was then transferred into normal maps. Honestly I’ve been stalling to learn this for too long, and now that I’ve done it once, it’ll be hard to not continue using it in the future. Just saves a lot of time, looks better than I expected, and is very modular in its workflow.

Other than that I forced myself for this piece to not bake in too much information that made the asset static in its placement or rotation. As in, I wouldn’t want someone to flip the wooden pieces and there would be a dark shadow on the other side from AO. There are still some gradients in here though, but in general, I think all of them are pretty flexible.

Raindrops Keep Falling

I was going through a difficult emotional time, and I was looking at some of my older 2D pieces I did as a teenager. I was looking at them and missed the days when the things I created things without any goals of improving this or that, or something that would have the goal of showcasing a certain skill or for a certain engine. Where things also weren’t perfect, it was just about capturing an emotion. So I went back here now, a little clumsy shaped character in a very blocked out environment. I wanted to make some kind of mix between hand-painted and PBR. The environment is based on my home town, Göta Kanal in Gothenburg.

I think a direction I really want to develop in is using a mix of hand-painted and stylized, while also using PBR. I sometimes feel like if I just use PBR, it can lose some organic touch to it, while if I go full hand-painted, then it takes tons of time to get to the end-result, while also making the model a bit too static (in terms of its visibility). In this case, I wanted the main subject to be the only thing that had its lighting painted in, while still employing some PBR in the material to give some nice variation and reaction to light sources.

One things I’ve always loved watching anime is having these big detailed backgrounds. While I’d love to develop further into Blender’s geometry nodes, for this piece I was happy to just use a simply array-system based on one piece. The reason I like this workflow a lot is that it’s so easy to block-out a big environment and get a good feeling of the piece quickly. Also like in this case, I knew I wanted to focus on the character in the middle, so just by looking at the block-out I kind of knew how much more detailed I’d have to go in order to finalize the piece.

I think in this piece I mostly continued on workflows that I already knew. I’m using the Blender array for quicker block-out, I’m using the modifiers with displacement to break up silhouttes, using particle systems to scatter rain, etc. But I just wanted to make this piece for me, without any pressure of “advancing” myself.

The Cake Shop

After working on a project that was getting way too big and starting to have its art direction go out of hand, I had hit an artistic standstill and I was unmotivated to touch any 3D-art on my freetime for months. Eventually, I told myself I’d do something small and decided that I wanted to learn more about Substance Designer, so I found this beautiful artwork by UrbanAnna20, and thought it would be a fun exercise to try recreating her art style as a Substance Designer material.

So my goal was try to recreate a material that mimicked these soft but distinctive brush-strokes. I had to do a little bit of a deep-dive in what I was actually looking for, and first and foremost, I needed the texture of the paper as a base. After that I noticed that the brush created this thicker, more intense part at the top.

At this point in time, I’m quite happy. I even make a floor tile.

In this one I even tried to create a bit of an outline, to mimic some kind of sketching before filling it with water color.

At this point I’m kind of okay with the materials. I did the thing I was supposed to do, but just looking at a material on a cube feels a little empty. And also, I felt like I wasn’t really capturing the whimsical feeling of UrbanAnna’s work: all the little knick-knacks and details that really gives that story-feeling to the scene. So I start modelling up the entire scene, and mostly using smart materials that I’ve set up in Designer. 

The one thing that didn’t really fly with that were the plants. I felt like I wasn’t skilled enough to make a proper Substance Designer material for them, and in a way it would just be much faster to draw these by hand to really capture that hand-drawn feeling.

I’m pretty happy with how these turned out, I thought I’d have to trick myself with some normal-editing, but honestly they kind of worked out-of-the-box.

Previously, I’ve only tried to capture the stylized feeling of an uneven hand-drawn line by putting bevels and pulling at vertices. But the thing is, I’m very lazy, and I’m wondering if there’s a better way of doing this.

So this is what I love about Blender. I can create a beveled object, I can then put it in an array, and if I after that stack a displacement modifier, I’m now kind of getting that warped hand-drawn feeling to my mesh. It’s even a noise that transfers between the object pieces, which really gives it the feeling that it’s one hand that trying to draw one straight line.

What I really enjoyed about this was that I’ve always kind of followed my own concepts, and I’ve never really done a deep-down into another artist in terms of material. For me it was a really fun challenge to really get every detail the way I wanted it, with even the actual paper-texture into the material.

I think the best takeaway here was the ability to create stylized meshes with modifiers, and the power of Substance Designer materials. It also finally made me realize that Substance Designer can be used to not only create stylized materials, but really hand-painted ones as well.

Coffee

The weekly prompy on Sketchfab was “Coffee”, and I remember I had this one photo of when we had some really good coffees in Split, Croatia. I was late on the challenge, so I made this within about a day, reusing my plants with modifiers again. Like I’ve tried before as well, I went back to try using triangles to create some shapes, like with the glasses.

I think I’m getting a little more cohesive with using polygons mixed with models that use textures. In this example the vases are made with Substance Painter, and I kind of feel like most items here kind of fit quite well together. 

I think one of my favorite things were the coffees, where I just went in to handpaint the cups and the coffees itself. Again, I feel like that whenever I’ve used different techniques (pure triangles, generation of textures of Substance Painter, and lastly handpainted), they’ve kind of clashed with each other, but now it kind of felt like it seemed likely they could belong to each other.

While cohesive, the glasses just look too perfect. If I had put in a little noise rough-map into the glass, I think it would’ve helped the scene come together better.

The table could’ve also gotten a little more love, right now the holes end quite abruptly, which obviously wouldn’t have been the case on a normal table. 

Lastly, I used the leaves themselves as a way to cast a shadow on the table, but I should’ve used some kind of tree-crown alpha to do that for me.

Gloom

I wanted to refresh some of my Zbrush knowledge so I went back one of my favorite Pokémon, Gloom. I honestly love this one, I feel bad that it seems so loving but people avoid it because of its smell. Kind of gives me like a Tove Jansson-character-energy. 

I’m not sure I would say much developed here more than refreshing some things. I will say this however, I feel like in my previous piece with Bulbasaur, I was “over-engineering” the texture and it became a little messy. In this piece, I wanted to focus more on just getting the silhouette, shapes and key-colors correctly; and if I did that, I wouldn’t need to “compensate” by over-painting the model. And I feel like I did do that, I was going back-and-forth with the feet a lot to really get the clean shapes. I’m trying to follow Follygon’s sculpting school which kind of puts more emphasis on just shapes rather than sculpting every detail.

One thing that I finally learned now was using Anchor Points in Substance designer to create the outline of the spots on the bulb. It was long overdue, but here I am.

House Plants

Plants around me die all the time, so at least in the 3D I can keep them forever. For this scene I wanted to just go absolute haywire with polys. I wanted to feel the difference between using actualy leaf-models and just alphas. This was also for me to just create a template plant using modifiers, and I love the ability to freely decorate a scene once you have the modifiers set-up properly.

I followed a tutorial for a pretty basic but well-done set-up of modifiers here, which allowed me to later modify the curve easily to get different plant formations.

The only thing I added myself along the line was the voronoi modifier after the array, just to get some plant-variation. This is the same technique used in “the Cake Shop” to get variation.

And since this set-up is modular, it was also relatively easy to create some alternative leaves to give the feeling of some other leaves as well.

Penny's Arcane Store

I wanted to get more into in-engine nitty gritty and decided to get into a proper Unreal project with RVTs and terrain-blending set-up. I ended up finding one of my older concepts for an RPG, and decided I’d dive into it and try making something that would run in real-time. The concept here was to make a witch’s cottage, but I found the stereotypical “old lady in an old cottage” to be a bit boring, so I wanted to imagine a witch who’s trying hard to pimp out her store and get people to visit.

I’m really happy I was able to create something this cohesive in Unreal. Not only could I get some time to familiarize myself with the Unreal 5 engine, but I also start to understand the importance of finding a good block-out and composition early in the process. I also got to throw myself deeper into Substance Designer. 

I would maybe have wanted to try a little more vertex color blending. 

Skopelos

I went to Skopelos for a week with my partner, and walking around in this space was such an amazing experience. While I was a bit of an art slump, I was looking through the photos on my phone and found this photo and thought about the idea of creating this environment and capturing that sense of enclosed chaos into a 3D-scene.

I’ve been pretty old-school so far and saving tris, using alphas, skipping modeling to use normalmaps… but lately, it’s becoming more and more apparent that tris won’t be the issue of the future. It’s something to keep in mind, but many of the artists I was following are transitioning to modeling out the details they want. So in this piece I did the same, I was just hammering out nitty-gritty details and I think the result kind of shows that. In the end, I had no issues rendering this entire environment in Unreal as well.

Everything in this scene was tailored for this specific view, and in hindsight, I should’ve split this up in more modular pieces and assembled them. One of my bigger issues was that unlike “conventional 3D-building”, the Greek buildings were in reality mostly big chunks of white rock, so the modular set I made at first didn’t really work. Having said that, it’s kind of lacking some detail to break up the paint.

Old Book that might summon something

A little practise to learn some new tools and new techniques! There’s not much of a story to this apart from that I wanted to try out Blender, but long story short, it’s in the end made in Maya #newUserStruggles.

I’m throwing myself in the world of Blender because I see how much it’s developing, and if I’m being honest; it either already is better than Maya, or is on the trajectory of surpassing Maya. So I just need to learn it. Unfortunately, for this model, the model broke because of my misunderstanding of some things, so I remade it Maya because I also wanted to learn more about the second part of this practise: generated texture. I’ve purchased the course of the coloring book from Stylized Station, and I wanted to test out some of the techniques I learned there for Substance Painter. I’m really happy with the end result.

I’ve learned some things in Blender which I’ll now adapt for my next model, I’m still adamant on learning Blender even though this one turned out to… not… have worked out. The only other thing I would’ve done differently is to do some explosion baking since there is some color ID bleed.

Bulbasaur

I feel like I wanted to get my creature sculpting up a bit, and watching Follygon’s amazing speed sculpts inspired me to go for Pokémon. Apart from being the first in the Pokédex, Bulbasaur is also by far my favorite of the gen 1 starters. 

I feel like I’m slowly finding my footing in ZBrush and Substance Painter. Not much in this scene is actually handpainted, most of it is just sculpted/modeled/generated. And to still get such a stylized is a pretty fun result to get.

This was just a speed sculpt so the UVs here are obviously not optimized in any capacity. Not sure I would do it differently though, it served its purpose of being a practise sculpt.

Lighthouse/Bar - "Drinks A'Hoy"

Story: Ernie and Simon have been living and working together in this lighthouse for 42 years, along side with their friend, the Turtle Aleggo who’s been there for who knows how long. 15 years ago, the government decided they no longer needed the lighthouse so they decided to sell it. When “Ernie found out that the current bidders just wanted to demolish the lighthouse, he convinced that they should just buy it, because why not? It was where they had spent and built their lives together! If this wasn’t their home, then what was?”

This was made for the “Lighthouse” Sketchfab-challenge. It conflates two concepts I had, one where there was a lighthouse fused with a bar, and one where the light itself was substituted with a giant firefly.

This was my first large scale project using Substance Painter. I was also had my Blender debut and created those bright neon signs beautifully. I believe the lighthouse became this everlasting cycle of feeling completed but then saying “wouldn’t this piece be better with…”. I created the opportunity to fake water being closer to surfaces with map baking and was able to make cute characters.

I went a little overboard on UV-optimization on this. I thought I was being clever when I split the lighthouse tower (the cylinder) into quarter pieces and simply duplicated & rotated the piece (except the entrance), and while I still think the idea was good, now every little “interesting” detail I made would make it glaringly obviously that it was just the same piece over and over again. So for next time, maybe I won’t make such huge pieces duplicated in a scene, alternatively, allow some space for variation by pieces that can be added on.

"in a thousand fairy tales, no one had described her as pretty"

This is a bit of John Bauer-ish inspired piece. Growing up in the pine forests of Sweden, I feel like the idea of trolls was quite whimsical and exciting.

I also wanted to portray some kind of sensation of feeling ugliness. I think when you live in society that always says that certain features are beautiful and some are not, they start tearing you down, and eventually there’s not much you can appreciate about yourself. I wanted to extend this idea to fairy tales, in fairy tales the beautiful creatures are elves with dainty feautres, fair skin, etc; trolls are always described as grotesque because of their large features, shabby clothes and hairyness. I do feel I made her quite cute in her own little way and these features aren’t inherently bad

My first real Zbrush character in a long time. I really wanted to sculpt a character in pose. I don’t know, I do love a nice character, but sometimes when you’re drawing, body features pushes flesh in a way that it’s quite difficult to capture in a rigged character. I do love the way the fingers turned out; the way they nestle into each other and if I hadn’t been able to do that properly, her emotions of being very unsure of herself would not have come through. For this piece I both used Painter and 3D-coat, and I thought it was a good idea to not choose between the two, but rather let them complement each other.

I think the scene in general is a bit tame and isn’t really giving her that environmental impact she could’ve used. I really wanted to make a water reflection, but I wasn’t able to make it happen. The symmetry isn’t great, and I wish that could’ve been done better.

Café Corner​

“I’m just gonna make a table and chairs to try out the new UV-mirroring techniques, that’s it”. That’s how it always starts out and then I am suddenly creating this ambiance to suit the space. In terms of wanting to try UV-saving techinques, it went well. I had an issue where the chairs were simply too similar, but then I was able to distort the UVs slightly to differentiate them just enough.

I’m pushing myself to use more polys. Whenever I see a chair like that, my main instinct is always to make a plane; but this time I needed to both push myself out of a modeling point of view, and also come to terms that modeling nowadays is using a lot more tris. Even in terms of mobile development many issues don’t come from tri-counts, but from texture map and pricy alpha channels. So in the same spirit, for this piece I tried to optimize my UV-space by mirroring dozens of objects, while still making sure they are still to UV-scale.

I always rush away from my concepts way too early. I do a little scribble and then I wanna get into the actual modeling, and then when I’m up close I don’t really know what to do. In the future I just need to nail the concept thoroughly before going on to modeling.

Fakemon: Veren

It’s not a secret I love Pokémon, and this was a part of my own Fakemon-dex, for the other Pokéfans out there, it’s the final stage of a Water/Grass Pokémon with the Water Absorb ability. 

One of the reasons I do love Pokémon is that they somehow managed to make such an amazing world where it’s very easy for fans to continue fantasizing what they would like to see in the world, and make the monsters in the game a great gameplay addition while also being lovable pets.

I really wanted to make a scene here I could show some kind of interaction, I love when you can tell that something is happening within a piece, and I wanted to really give this credibility of being in the Pokémon Universe by also adding the Horseas and Cloysters.

I tried out the outlining technique here which I think worked very well with more toonish look of this. I also tried the fake lighting that simply are planes with fading textures which I think worked very nicely, so again, I think there’s so much that you can give an idea of with simple 2D-objects in 3D-environments that can really bolster the content.

While I actually kind of like the angular shapes, the hair is just too low poly. I got some great feedback from friends who pointed out that I could make it smooth in general, and then with intention “angularize” certain parts for the sake of silhoutte. Then it would really look like I’m choosing where I want the angularity, rather than it being a product of low polys.

South Asian Sweet​

Sketchfab had a LowPoly Dessert Challenge, and I thought it would be fun to tap into something that my mom used to make me as a kid. Well, half-truth. This is a fictional mix between Gulab Jamun and Rasgulla; and to be honest, they’re just way too sweet. But they’re quite pretty to look at. This was completely made in 3D-coat, when I wanted to try out their modeling tools.

I’ve always just stuck to the painting part of 3D-coat, and I feel like it was a bit of a waste of its potential. While I thought some features were cool, I’m not sure if I felt their tools were necessarily as good a Zbrush’s.

I kind of like this, but the polygons are a little bit too obvious. I think this would be even better with a baked map.

The Astronaut Who Never Went to Space

I wanted to try making an entirely painted piece, so this is a completely unlit piece that just has entirely baked/painted lighting into it.

The idea of this work is more about unfulfilled dreams.

I saw someone on Sketchfab who kind of “faked” light range with a simple sphere; I thought this looked quite cute and thought it gave it a nice toonish way of portraying light.

I think this filled its purpose, but I should’ve considered lighting more if painting an entire environment was the goal; which is to say, shared UV-spaces will work poorly if they’re used in two spaces that have vastly different lighting.